This tutorial demonstrates how to quickly build an AI agent using n8n that can answer questions about some sample data. The agent leverages MongoDB as both a vector store for document retrieval and a chat memory store for conversation persistence.
About the n8n Workflow with MongoDB
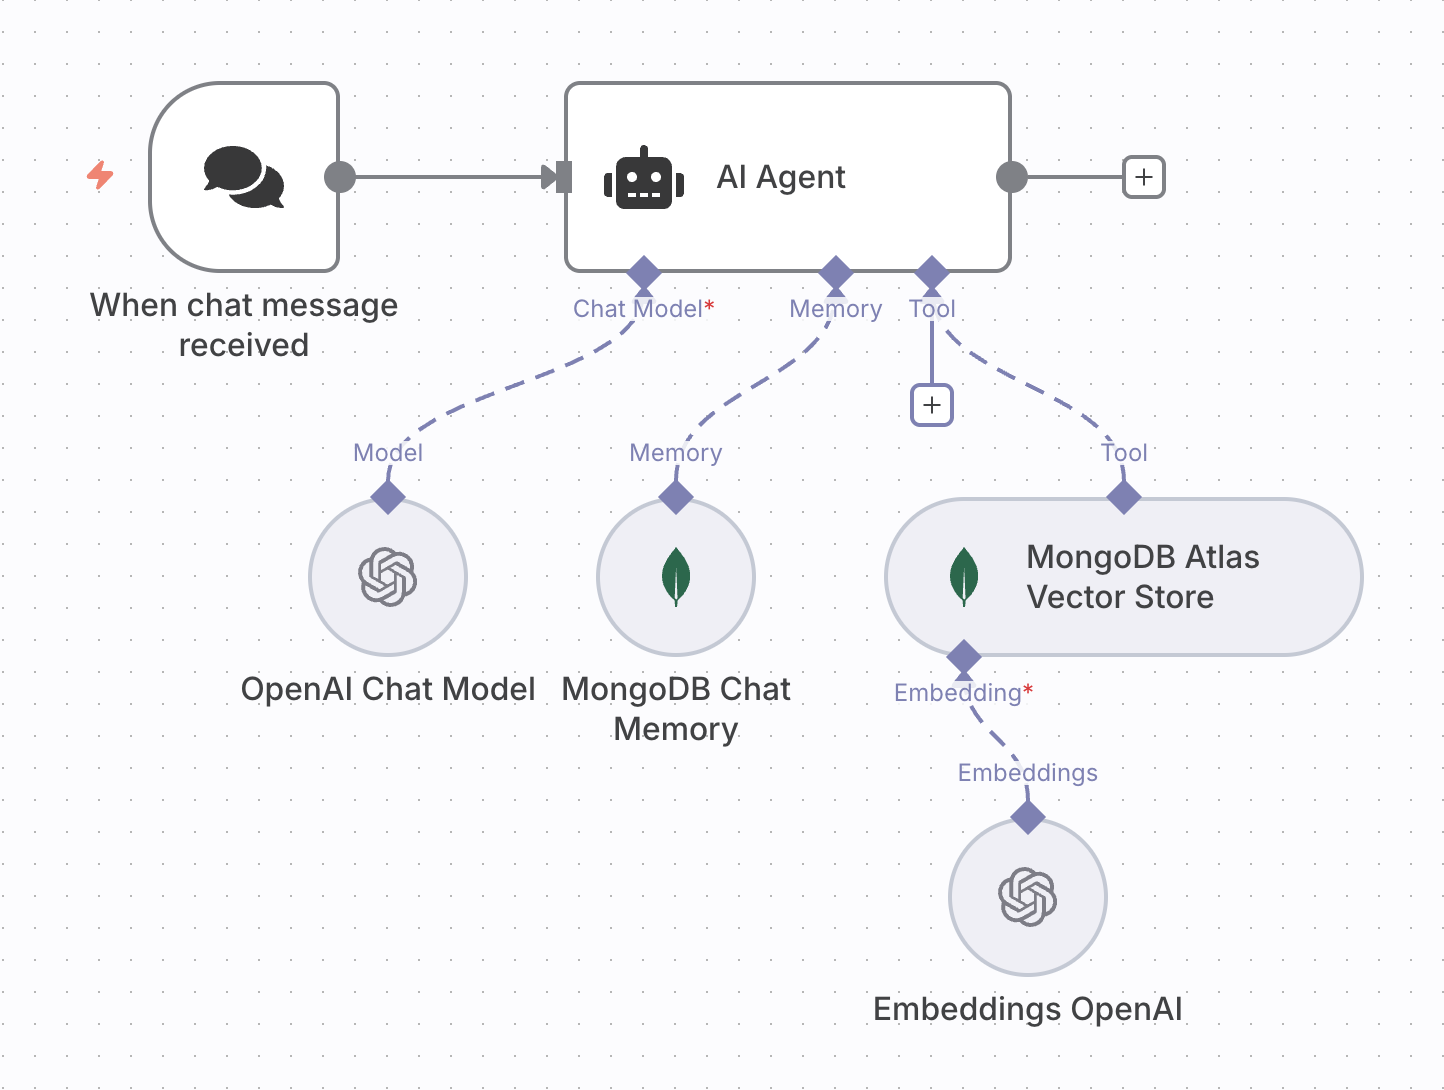
The following screenshot demonstrates the workflow that you will build in this tutorial. In this workflow, you create an AI agent that uses two MongoDB nodes:
MongoDB Atlas Vector Store Node to retrieve relevant documents from the sample data
MongoDB Chat Memory Node to store conversation history
It also uses OpenAI as the LLM and embedding model provider.
When you send a message to the agent, it triggers the following actions:
The AI agent node processes the user message and determines the next action.
The AI agent checks whether it needs to make any tool calls.
If yes, it calls the MongoDB Vector Store node to retrieve documents.
If not, it continues to the next action.
The agent generates a response using the LLM that you configured for the workflow.
After each interaction, the MongoDB Chat Memory node stores the conversation history.
Note
The red asterisks in the AI Agent node's configuration indicate required parameters.
Prerequisites
Before you begin, ensure that you have the following:
One of the following MongoDB cluster types:
An Atlas cluster running MongoDB version 6.0.11, 7.0.2, or later. Ensure that your IP address is included in your Atlas project's access list.
A local Atlas deployment created using the Atlas CLI. To learn more, see Create a Local Atlas Deployment.
A MongoDB Community or Enterprise cluster with Search and Vector Search installed.
The sample data loaded into your MongoDB deployment.
An OpenAI API key, or an API key for any other supported provider of LLMs and embedding models that you intend to use.
Considerations
When working with n8n and MongoDB, consider the following:
For MongoDB Atlas users, ensure that you add your n8n IP addresses to your project's IP Access List. To learn more, see Network Access.
When configuring the MongoDB Vector Store node, ensure that you toggle the Include Metadata to Off. If you don't toggle this setting to Off, the AI agent might not run as the documents might be too large to load into the context window.
Create the Vector Search Index
You must create a vector search index on your collection before you can use the MongoDB vector store node.
In Atlas, go to the Clusters page for your project.
WARNING: Navigation Improvements In Progress We're currently rolling out a new and improved navigation experience. If the following steps don't match your view in the Atlas UI, see the preview documentation.
If it's not already displayed, select the organization that contains your desired project from the Organizations menu in the navigation bar.
If it's not already displayed, select your desired project from the Projects menu in the navigation bar.
If it's not already displayed, click Clusters in the sidebar.
The Clusters page displays.
Go to the Collections page.
Click the Browse Collections button for your cluster.
The Data Explorer displays.
Start your index configuration.
Make the following selections on the page and then click Next.
Search Type | Select the Vector Search index type. |
Index Name and Data Source | Specify the following information:
|
Configuration Method | For a guided experience, select Visual Editor. To edit the raw index definition, select JSON Editor. |
IMPORTANT:
Your MongoDB Search index is named default by default. If you keep this name, then your index will be the
default Search index for any MongoDB Search query that does not specify a different index option in
its operators. If you are creating multiple indexes, we recommend
that you maintain a consistent, descriptive naming convention across your indexes.
Define the MongoDB Vector Search index.
Specify plot_embedding as the field to index and specify
1536 dimensions.
To configure the index, select Cosine from the Similarity Method dropdown.
Paste the following index definition in the JSON editor:
1 { 2 "fields": [ 3 { 4 "type": "vector", 5 "numDimensions": 1536, 6 "path": "plot_embedding", 7 "similarity": "dotProduct" 8 } 9 ] 10 }
Check the status.
The newly created index displays on the Atlas Search tab. While the index is building, the Status field reads Build in Progress. When the index is finished building, the Status field reads Active.
Note
Larger collections take longer to index. You will receive an email notification when your index is finished building.
To use a different index creation method, follow the steps in the index creation procedure. Use the following configuration:
{ "fields": [ { "type": "vector", "path": "plot_embedding", "numDimensions": 1536, "similarity": "dotProduct" } ] }
Configure Credentials in n8n
In this section, you complete the steps to configure the required credentials in n8n.
Add credentials for your model provider.
From the drop-down menu, select the credentials to configure.
For example, select OpenAI and click Continue.
To see which parameters to enter for your model provider, check the Credentials Library.
For example, for OpenAI, enter the API Key, the name of the organization, and the base URL.
Click Save. n8n adds the credential to your personal space.
Add credentials for MongoDB.
Follow the same instructions described in the previous step to add your MongoDB credentials to n8n. Specify the following values:
Setting | Value |
|---|---|
Configuration Type | In the dropdown menu, select the Connection String method. |
Connection String | Enter your MongoDB Connection String. To learn how to find your MongoDB connection string, see Connection Strings. |
Database | Enter sample_mflix. |
Configure the AI Agent Workflow
Complete the following steps in n8n to build an AI agent workflow with MongoDB and n8n. To learn more about the workflow, see About the n8n Workflow with MongoDB.
Add a Chat Trigger node.
All workflows in n8n start with a trigger node. For this workflow, you use a chat trigger node so that the AI agent workflow is triggered by a user message.
Select Add first step or press Tab to open the node menu.
Search for Chat Trigger. n8n displays a list of nodes that match the search.
Select Chat Trigger to add the node to the canvas.
Click Back to canvas in the upper-left corner of your screen. You can skip testing this node at this stage. Click Save.
Add an AI Agent node.
In the AI Agent node, you configure the chat model, memory, and tools. These are required components of the AI Agent node where you add additional nodes and sub-nodes.
Select the + connector on the trigger node.
Search for the AI Agent node and add it to the workflow. The editing view of the AI agent displays.
Click Back to canvas in the upper-left corner of your screen. You can skip testing this node at this stage. Click Save.
Configure the chat model.
Configure the chat model to attach the node to process incoming prompts:
Click the + connector next to the Chat Model label on the AI Agent node. The search panel appears, filtered on Language Models.
Select OpenAI Chat Model from the list, or your preferred LLM provider.
Click Credential to connect with.
After selecting your credentials, choose a model from the drop-down menu (for example,
gpt-4o).Click Back to canvas in the upper-left corner of your screen. You can skip testing this node at this stage. Click Save.
Click the AI Agent icon at the top of the dialog box to return to the AI Agent node configuration.
Add the MongoDB Chat Memory sub-node.
Configure the MongoDB Chat Memory sub-node to enable persistent conversation context.
Click the + connector next to the Memory label on the AI Agent node.
From the side panel, select MongoDB Chat Memory.
Click Select credential, then select your MongoDB credentials.
Use the default configurations for the MongoDB Chat Memory node. By default, n8n creates a collection called
n8n_chat_historiesin the specified database.Click Back to canvas in the upper-left corner of your screen. You can skip testing this node at this stage. Click Save.
Click the AI Agent icon to return to the AI Agent node configuration.
Add the MongoDB Atlas Vector Store node as a tool.
Configure the MongoDB Atlas Vector Store node to enable document retrieval.
Click the + connector next to the Tool label on the AI Agent node.
In the search panel, select MongoDB Atlas Vector Store.
Select the MongoDB credentials that you configured, and then specify the following values:
SettingValueOperation Mode
Retrieve Documents (As Tool for AI Agent)
Description
"Search through documents about movies to find relevant information"MongoDB Collection
embedded_moviesEmbedding
plot_embeddingMetadata Field
plotVector Index Name
vector_indexLimit
4Include Metadata
Toggle to Off
IMPORTANT:
If you don't toggle this setting to Off, the AI agent might not run as the documents might be too large to load into the context window.
Rerank Results
Toggle to Off
Configure the embedding model.
Configure the embedding model for the MongoDB Atlas Vector Store node:
Click the + connector next to the Embedding label on the MongoDB Atlas Vector Store node.
From the side panel, select Embeddings OpenAI.
Select your OpenAI credentials, and then specify the
text-embedding-ada-002model.Click Back to canvas in the upper-left corner of your screen. Click Save.
Test the workflow.
Now that you've configured the AI Agent node, you can test the complete workflow. After you send a message, the workflow runs in real-time on the canvas.
Click the Open chat button near the bottom of the canvas.
Test the memory functionality by running a few initial prompts. For example:
Hi, my name is Mongo Hello Mongo! Nice to meet you. How can I help you today? What is my name? Your name is Mongo, as you mentioned when you introduced yourself earlier. Test the vector search and RAG functionality by running the following prompt.
Recommend me a few movies about time travel Here are a few movies about time travel that you might enjoy: The Time Traveler's Wife - A romantic drama about a Chicago librarian with a gene that causes him to involuntarily time travel, leading to complications in his marriage. Timecop - An officer working for a security agency that regulates time travel must battle for his life against a corrupt politician tied to his past. We Are from the Future (My iz budushchego) - Four modern-day treasure seekers are unexpectedly transported into the midst of a World War II battle set in Russia. About Time - A young man discovers at the age of 21 that he can travel back in time. He attempts to improve his life, including finding love, but things don't turn out to be as simple as they seem. Let me know if you'd like any additional information about these films!